Periodic Windows 11 boot failures require a systematic approach to operating system diagnostics using built-in console utilities. Utilizing CMD and PowerShell tools allows you to quickly isolate hidden system file corruption, disk errors, and driver initialization failures.
A step-by-step execution of specialized commands restores computer boot stability, completely eliminating the need for an emergency reinstallation of the software environment.
Causes of Unstable Operating System Booting
If the operating system boots incorrectly specifically after the logo appears, the root of the problem lies within the software layer or the hardware response of the solid-state drive.
This type of failure narrows down the scope of possible causes to specific Windows 11 components.
Most frequently, a black screen or intermittent system hangs are caused by the following destructive factors:
- Critical corruption or absence of vital system files responsible for starting the interface.
- Graphics driver malfunctions that prevent the correct rendering of the graphical shell.
- Conflicts with the Fast Startup feature, which saves kernel errors to the hibernation file.
- Incorrectly installed or interrupted Windows operating system updates.
- Hardware defects of the SSD or progressive damage to the file system structure.
Command Execution Order for Recovery
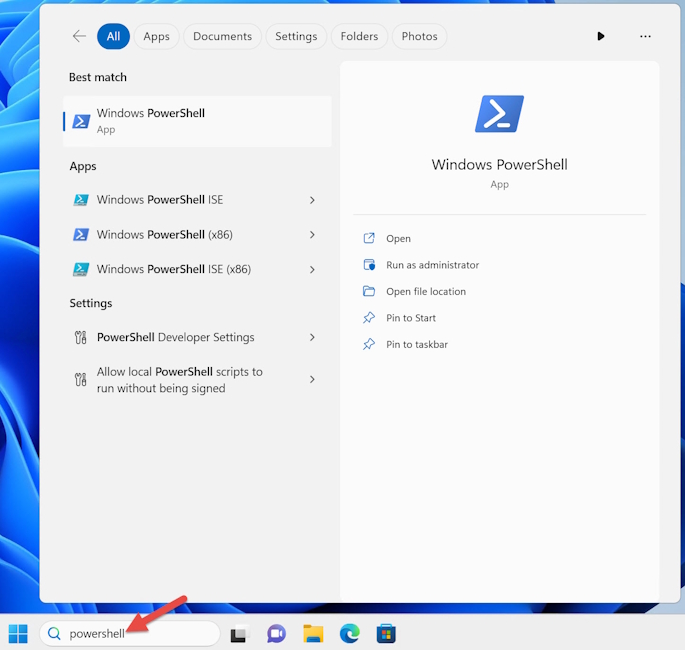
To eliminate software corruption, you must open the PowerShell console as an administrator and strictly follow a specific order of actions. Disrupting the execution sequence of these utilities will lower the overall effectiveness of the recovery procedures and prevent full repair of the system image.
The recommended boot repair algorithm is structured as follows:
- Initial integrity audit and automatic repair of protected system files.
- Express check of the local system image for documented errors.
- Launching a deep scan of the component store for hidden corruption.
- Full restoration of Windows components from the original cloud source.
- Final reinforcement of results and re-verification of system files.
- Low-level verification of the system disk’s logical structure for partition errors.
- Identification of physical drives to rule out hardware disconnection.
- Extracting detailed SMART attributes and hardware health metrics of the solid-state drive.
PowerShell vs. Command Prompt
The main advantage of PowerShell over the classic Command Prompt (CMD) lies in its object-oriented nature: while CMD exclusively outputs and processes flat text that requires complex manual parsing,
PowerShell operates with full-fledged .NET objects, allowing you to directly extract, filter, and pass specific data properties down the pipeline from one command to another. Thanks to this architecture, as well as complete access to deep system interfaces (WMI/CIM), hardware components, the system registry, and modern cloud environments, PowerShell stands as a comprehensive, scalable automation language, whereas CMD remains an outdated legacy tool with a rigidly limited set of basic commands.
Out of the commands listed below, the following work in both CMD and PowerShell (classic utilities):
- sfc /scannow
- All DISM commands
- chkdsk C: /f
- All netsh commands
Work ONLY in PowerShell (specific cmdlets):
- Get-PhysicalDisk (including piping via | to Get-StorageReliabilityCounter)
- Set-ItemProperty (command for the registry/Fast Startup)
- Disable-MCAgent
- Clear-BcdElement
- Get-WindowsUpdateLog
- Disable-ComputerRestore
A simple rule: Anything written with a hyphen in a Verb-Noun format (Get-, Set-, Disable-) is a cmdlet and will not function in the standard CMD prompt.
Detailed Breakdown of Console Commands
- sfc /scannow — Scans and automatically restores corrupted Windows system files.
The sfc /scannow command launches a system scanner that checks all critical operating system files for replacement, modification, or deletion. The utility compares current file versions against a reference copy stored in an isolated cache and automatically restores corrupted structures. Running it at the very beginning is necessary for baseline environment stabilization before performing more complex disk operations.
- DISM /Online /Cleanup-Image /CheckHealth — Instantly checks the system image for previously detected errors.
The DISM /Online /Cleanup-Image /CheckHealth tool performs an instantaneous query of the local component store for corruption flags left behind by previous crashes. This command does not execute a new scan; it merely reads error markers already recorded by the system, allowing you to quickly assess the scale of the problem. It serves as a starting point to understand if global intervention in the OS image is required.
- DISM /Online /Cleanup-Image /ScanHealth — Launches a deep, byte-by-byte analysis of the component store for hidden defects.
The DISM /Online /Cleanup-Image /ScanHealth command performs a full, deep scan of the entire Windows component store for hidden corruption. Unlike the previous step, the utility verifies data integrity byte by byte, which takes significantly more time. Based on the results, it outputs a precise conclusion on whether the current image can be repaired via software.
- DISM /Online /Cleanup-Image /RestoreHealth — Downloads clean files from Windows Update and fully restores the OS image.
The DISM /Online /Cleanup-Image /RestoreHealth utility activates the recovery procedure for a corrupted Windows 11 image, using Windows Update as the source for clean files. It automatically downloads original versions of corrupted components and replaces the defective elements in the local store. This restores the foundation of the OS, from which all system processes are subsequently deployed.
- Running sfc /scannow Again
Executing sfc /scannow a second time is a mandatory reinforcing step after successfully restoring the image via DISM. Because the baseline component archive is now fully functional, running the file scanner again guarantees that defective working system files are replaced with their clean reference copies. This completely eliminates the cyclical errors that caused Windows 11 to boot only every other time.
- chkdsk C: /f — Fixes logical errors, partition issues, and corrupted sectors on drive C (executed upon reboot).
The chkdsk C: /f command initiates the repair of logical errors, partition corruption, and damaged indexes on the system volume. Since the target C: drive is actively used by the running operating system, the utility will request confirmation to perform the analysis during the next PC startup. Once confirmed and the computer reboots, the file system scan will begin, eliminating freezes during the kernel initialization phase.
- Get-PhysicalDisk — Displays a list of connected drives, their models, and current operational status.
The Get-PhysicalDisk PowerShell cmdlet is used to output baseline information about all drives connected to the motherboard. It allows you to verify that the system correctly detects the SSD, identify its exact model, connection interface, and current operational health status. This step is essential to rule out sudden hardware drive disconnections during unstable boots.
- Get-PhysicalDisk | Get-StorageReliabilityCounter — Extracts hardware wear metrics and SMART data from the solid-state drive (SSD).
Piping Get-PhysicalDisk | Get-StorageReliabilityCounter extracts detailed hardware reliability counters and SMART data directly from the SSD controller. Based on this information, you can analyze the wear percentage of memory cells, the number of critical read-write errors, and temperature anomalies. A spike in these metrics directly points to physical degradation of the drive as the primary cause of boot failures.
Additional Repair Methods via PowerShell
For advanced diagnostics and the resolution of related boot issues tied to hardware initialization and updates, PowerShell provides additional specialized tools.
Applying them helps resolve hidden conflicts in the Windows 11 configuration that cannot be fixed by standard file checks.
| PowerShell Tool | Operation Purpose | Expected Result |
| Disable-MCAgent | Disabling the hardware failure prediction agent | Reduction of latencies during CPU and RAM conflicts |
| Clear-BcdElement | Clearing obsolete records in the boot configuration | Elimination of false paths for the Windows kernel boot |
| Get-WindowsUpdateLog | Merging update logs into a single text file | Localization of stuck or corrupted update packages |
To radically resolve issues with the quick startup feature, use the PowerShell command Set-ItemProperty -Path ‘HKLM:\SYSTEM\CurrentControlSet\Control\Session Manager\Power’ -Name HiberbootEnabled -Value 0, which completely disables Fast Startup at the system registry level, forcing Windows 11 to perform a clean boot of all drivers from scratch every time.
Additionally, completely resetting the network stack using the netsh int ip reset and netsh winsock reset commands is highly effective, as incorrect initialization of network drivers during user authentication frequently causes system freezes and a black screen.
It is also worth noting the Disable-ComputerRestore cmdlet, which temporarily disables restore points if a cyclical error is caused by a shadow copy conflict at startup.
- Set-ItemProperty -Path ‘HKLM:\SYSTEM\CurrentControlSet\Control\Session Manager\Power’ -Name HiberbootEnabled -Value 0 — Completely disables Fast Startup to eliminate cyclical black screens.
- netsh int ip reset — Resets TCP/IP protocol parameters, resolving freezes caused by network drivers.
- netsh winsock reset — Clears the Winsock catalog, restoring correct network stack initialization at startup.
- Disable-MCAgent — Disables the background hardware failure prediction agent, removing micro-stutters in the CPU and RAM.
- Clear-BcdElement — Removes false and obsolete records from the Windows boot configuration.
- Get-WindowsUpdateLog — Collects scattered system update reports into a single text file to locate a failing package.
- Disable-ComputerRestore — Temporarily disables the system restore point service if the freeze is caused by a shadow copy error.
Graphics Card Diagnostics via PowerShell
Out of the box, PowerShell cannot run graphical stress tests (like FurMark or 3DMark)—you won’t be able to push a graphics card to its limits using purely scripts. However, for gathering technical data, checking error codes (for example, when a card drops out with “Error 43”), and monitoring status, PowerShell boasts an excellent arsenal.
Here are the primary commands, categorized by task, that will help you evaluate your graphics card at both the software and hardware levels.
These commands replace a trip to Device Manager and immediately show whether the system sees the graphics card normally or if it is malfunctioning.
- Get-PnpDevice -Class Display
The fastest way to check if the hardware is running fine.
- What it does: Displays a list of all display adapters (integrated and discrete) and their current status.
- What to look for: If the Status column reads OK, the device initialized successfully. If it says Error or Unknown, the card is malfunctioning. To uncover a specific error code, use the expanded version:
Get-PnpDevice -Class Display | Select-Object FriendlyName, Status, Problem, ProblemDescription- Get-CimInstance Win32_VideoController
A query to the WMI/CIM system interface to pull the graphics card’s passport data.
- What it does: Displays the basic specifications of the graphics chip.
- Useful command assembly (outputs only the essentials):
Get-CimInstance Win32_VideoController | Select-Object Name, DriverVersion, DriverDate, StatusIt will show the exact name of the card, the date and version of the installed driver, and the system status.
- dxdiag /t $env:USERPROFILE\Desktop\dxdiag_report.txt
PowerShell doesn’t diagnose the graphics API directly, but it can quietly deploy the native Windows diagnostic tool against the graphics card.
- What it does: Launches the dxdiag utility in the background, performs a full DirectX audit, verifies driver digital signatures (WHQL), and saves a highly detailed log to a dxdiag_report.txt file on your Desktop.
- Where to look for problems: Open the generated text file and find the Display Devices section. Look for the Notes or Diagnostics lines—if there are issues with the card, DirectX will write the error text directly there.
If you have an NVIDIA graphics card installed (with official drivers setup), you have access to a highly powerful console utility called nvidia-smi, which can be invoked directly inside PowerShell. It replaces heavy third-party monitoring software.
- nvidia-smi
What it does: Provides an instant snapshot of the card’s state: current GPU temperature, power consumption (in Watts), graphics core utilization in %, and allocated video memory (VRAM).
You can also launch continuous monitoring (similar to Task Manager). If you need to run the PC and check if the card overheats under load, execute this in PowerShell:
while($true) { Clear-Host; nvidia-smi; Start-Sleep -Seconds 2 }The screen will refresh every 2 seconds, displaying the real-time temperature and load. If the temperature exceeds 85–90°C at the moment of a system crash, overheating is the issue.
Here is a quick summary table of diagnostic commands:
| Diagnostic Task | PowerShell Command | What to Look for in the Results |
| Finding hardware conflicts | Get-PnpDevice -Class Display | Any status other than OK (e.g., error code 43). |
| Verifying software relevance | Get-CimInstance Win32_VideoController | Driver version and date (compare with the manufacturer’s website). |
| Finding hidden 3D engine crashes | dxdiag /t [file_path] | Rendering errors and Direct3D failures in the text report. |
| Overheating and memory test | nvidia-smi (GeForce/RTX only) | Exceeding temperature limits or VRAM maxed out at 100%. |

I’m Irina Petrova-Levin, a graduate of the Moscow Technical University of Communications and Informatics (MTUCI), where I earned my degree in Information Technology. My professional journey has been deeply rooted in JavaScript, PHP, and Python, driven by a profound fascination with how modern technology shapes our everyday lives. I strive to explain complex processes in a clear and accessible way without ever sacrificing accuracy or missing the core of the matter.
Now based in Dallas since 2019, my work reflects a unique synthesis of Eastern European engineering depth and the dynamic American tech mindset. This blend allows me to bridge two distinct technological traditions.
My goal is to deconstruct the real mechanisms behind the devices and systems we use daily. In my articles, I aim to deliver information that is not only practical and structured but also reveals the hidden logic of how our world actually works.